Starting the First Layer of an Igloo and Building the Ramp

GETTING STARTED ON THE FIRST LAYER

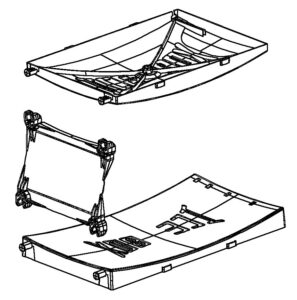
Push the stake of the assembled ICEBOX® into the center of the site where you plan to build your igloo, while leaving the flange of the stake about ¼ inch from the floor. Walk the ICEBOX® around the perimeter of the packed igloo site checking to see if the igloo will be centered on your platform. You can decide where to place the igloo at this time. If you are too close to a rock or tree you won’t be able to release the form.
To begin building the igloo the Form Handler kneels with the pole running between his legs.

Igloo Ed kneeling and positioning the ICEBOX Igloo Tool

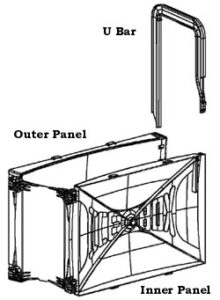
When positioning the form, the Inner Panel of the form should sit at a right angle to the pole as seen from above.
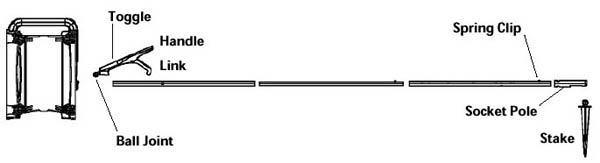
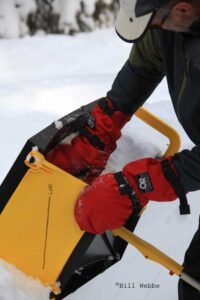
As you begin to build the igloo, the Form Handler tips the ICEBOX® towards him so that the line on the End Panel, marked “square to floor”, is perpendicular to the floor.

Shoveling snow into the ICEBOX Igloo Tool

Choose the “square to floor” line that corresponds to the size igloo you are building. The shoveler should stand where he can easily see the square to floor line and let the Form Handler know when he has tilted it into the proper position. You can also attach a weighted line through the appropriate hole at the top of the square to floor line which can also help position the form correctly.


*One thing to note is that the “square to floor” line is used for the first layer only. The tip angle for the rest of the layers will be determined by centering the bottom of the form on the block below.

Positioning the ICEBOX Igloo Tool

With the form properly placed, start shoveling snow into the corner formed by the two Outer Panels and the End Panel. With each shovelful, the Form Handler packs the snow with the palm of his hand.

Packing snow into the ICEBOX Igloo Tool
BUILDING THE RAMP

The first two blocks of the first layer will only be partially filled to form a ramp.

On the first block, when you have filled the form to one-third of its height on the End Panel end, release the U Bar and the toggle. Move the form to the left while holding it down to the floor and sliding it. Watch that the toggle handle doesn’t reset itself. Tipping the form inward while you are sliding it will help to keep the toggle from toggling by itself.

Moving the ICEBOX Igloo Tool
Remove the form from the wall and set it down on the flat platform so the U-Bar slides back down freely.

Setting the ICEBOX Igloo Tool on the wall to move to next block

Then push down the Toggle Handle and reposition the form. Reposition the form by overlapping the first block on your ramp for a couple inches.

Positioning the ICEBOX Igloo Tool

On this block, the first shovelful should be put against the end of the first partial block. As the blocks get fuller, the existing block becomes a support for the form while building the next block. Pack the ICEBOX® until it fills two-thirds full on the End Panel end.


Repeat the process until the third block of the ramp fills the form full on the End Panel creating the first full block of the first layer. From this point on, the form is filled to the appropriate fill level for the size igloo you are building.


This fill level is included on the Outer Panel along with the pole assembly chart.

Assembling the ICEBOX Igloo Tool

ASSEMBLE THE PLASTIC FORM

  1. Place the Outer Panel (largest panel) of the slip form on a flat surface with the ribbed side facing down and the snap posts to your left.
  2. Snap the End Panel (yellow panel) on to the posts. Make sure the edge marked “bottom” is toward you and the side labeled “square to floor” is facing out and to your left.
  3. With the ribbed side facing up, snap the Inner Panel (smaller black panel) onto the End Panel.

Diagram illustrating assembling the plastic form of the Icebox

  • Roll the assembly toward you so that the Outer Panel faces away from you and the End Panel is to your left.
  • Note the slots on the top right end of both the Outer Panel and the Inner panel. Insert the U-Bar into these slots so that the longer end slides smoothly into the Outer Panel. The cam on the U Bar will snap into the slot on the Inner Panel.

Diagram illustrating assembling the ubar on the plastic form of the Icebox

ASSEMBLE THE POLE

There are five pole segments with the ICEBOX kit: four larger diameter poles that are marked Igloo Size 8 or 9 ft, Igloo Size 11 ft, Igloo Size 10 ft, and 7ft Igloo. The fifth pole is a smaller diameter pole with two spring clips.

  1. Find the larger diameter pole that is marked with the size igloo you want to build. There is a spring clip at the end of this pole. Snap the plastic socket pole onto this spring clip.
  2. Snap the socket pole onto the stake. The socket pole is constructed so that the stake will hang downward on one side only.
  3. Insert the Small (diameter) Pole into the opposite end of the pole previously inserted into the Socket Pole. Slide it into the larger segment until the spring clip slips into the hole marked “1”.
  4. Insert the opposite end of the Small Pole into the remaining large pole of the pole assembly until the spring clip snaps into the first hole marked “8”.
  5. The Toggle Assembly consists of the Toggle Link and the Toggle Handle. With the pole horizontal and the stake hanging down, place the toggle on the top side of the pole assembly by inserting the end of the pole into the pocket in the toggle handle and then puling out the toggle link and snapping the clips into the holes marked “P”.
  6. Snap the Toggle Handle ball into Inner Panel.

Diagram illustrating the Icebox pole assembly

The 7 ft. igloo is slightly different: the 7 ft. pole goes into the socket pole and the 10 ft. pole goes on the toggle end. The Small Pole spring clip goes into the #2 hole marked 7 ft. on the 10 ft. pole.

Diagram showing all configurations of Icebox pole assemblies

There is also a chart on the Outer Panel that shows which pole assembly to use while building the size igloo you want.