Sew Your Own Lightweight DIY Tipi Hot Tent
Follow the steps below to sew your own do-it-yourself (DIY) single pole lightweight tipi/teepee hot tent
(Commercial Options: Kifaru or Cabela’s Outback Lodge is similar – but a bit heavier)
*Special thanks to my homemade tent mentor – Joe Phannenstein
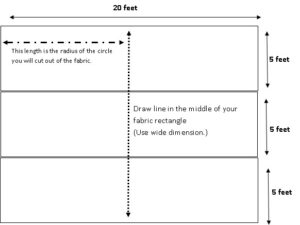
1. To start, you can use high quality tarp or sew 3 or four swatches of cloth together to make a large rectangle with a proportion of 3 to 4 (for example 15 by 20 feet). For larger tepees, you can make a taller and narrower tepee by reducing the ratio to 2 to 3 (for example 20 by 30).
2. Find the center point of the rectangle (on the wider dimension). Draw a line marking this center. As you find this half way point – write down the length of this line. It will become the radius of your circle in making the cone.

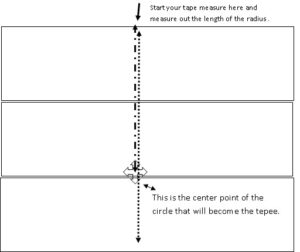
3. Go to end of the rectangle cloth (wider dimension) where your mid line intersected the cloth. Measure along this line and mark the cone’s midpoint using the radius you determined earlier.

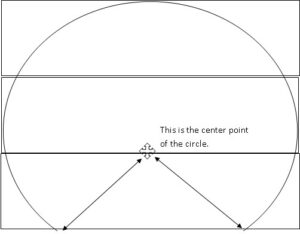
4. Using a piece of string the length of your radius, have your partner hold the string at the marked midpoint and draw out the circumference of your cone. Cut out the cone shaped piece of cloth.

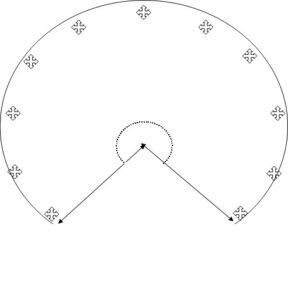
5. Draw a line from the corners of your circle to the center point. Cut out the piece of pie from your cone.
6. You now have your tent shape. Cut and sew in some reinforcing fabric for the top of your cone in a miniature version of the shape you now have. You have one seam. The top portion will be a seam and you will sew in a zipper on the bottom portion.

7. Mark out equal distant spots on the outside edge of the cone and sew in your tent stake loops.
8. Sew in your fiberglass cloth for the stove jack.
A tent like this allows campers to create a lightweight winter hot tent camping setup that fits on a standard sled (like the Paris Expedition) so you can enjoy some of the comforts of hot tenting while pulling a lighter load!
