ASSEMBLE THE PLASTIC FORM
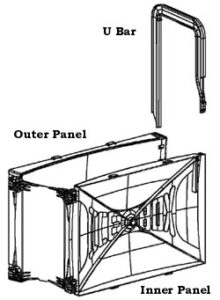
- Place the Outer Panel (largest panel) of the slip form on a flat surface with the ribbed side facing down and the snap posts to your left.
- Snap the End Panel (yellow panel) on to the posts. Make sure the edge marked “bottom” is toward you and the side labeled “square to floor” is facing out and to your left.
- With the ribbed side facing up, snap the Inner Panel (smaller black panel) onto the End Panel.
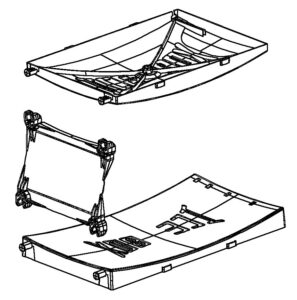
- Roll the assembly toward you so that the Outer Panel faces away from you and the End Panel is to your left.
- Note the slots on the top right end of both the Outer Panel and the Inner panel. Insert the U-Bar into these slots so that the longer end slides smoothly into the Outer Panel. The cam on the U Bar will snap into the slot on the Inner Panel.
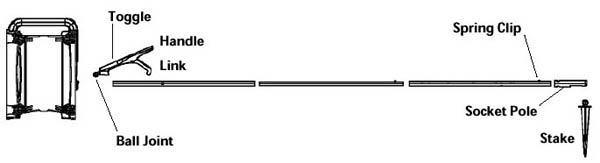
ASSEMBLE THE POLE
There are five pole segments with the ICEBOX kit: four larger diameter poles that are marked Igloo Size 8 or 9 ft, Igloo Size 11 ft, Igloo Size 10 ft, and 7ft Igloo. The fifth pole is a smaller diameter pole with two spring clips.
- Find the larger diameter pole that is marked with the size igloo you want to build. There is a spring clip at the end of this pole. Snap the plastic socket pole onto this spring clip.
- Snap the socket pole onto the stake. The socket pole is constructed so that the stake will hang downward on one side only.
- Insert the Small (diameter) Pole into the opposite end of the pole previously inserted into the Socket Pole. Slide it into the larger segment until the spring clip slips into the hole marked “1”.
- Insert the opposite end of the Small Pole into the remaining large pole of the pole assembly until the spring clip snaps into the first hole marked “8”.
- The Toggle Assembly consists of the Toggle Link and the Toggle Handle. With the pole horizontal and the stake hanging down, place the toggle on the top side of the pole assembly by inserting the end of the pole into the pocket in the toggle handle and then puling out the toggle link and snapping the clips into the holes marked “P”.
- Snap the Toggle Handle ball into Inner Panel.
The 7 ft. igloo is slightly different: the 7 ft. pole goes into the socket pole and the 10 ft. pole goes on the toggle end. The Small Pole spring clip goes into the #2 hole marked 7 ft. on the 10 ft. pole.
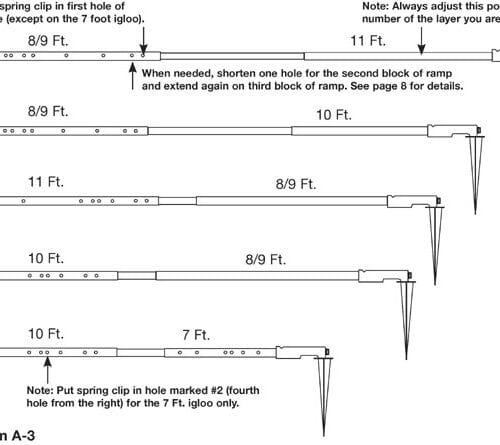
There is also a chart on the Outer Panel that shows which pole assembly to use while building the size igloo you want.